Showing posts with label Mushrooms. Show all posts

Thursday, 29 October 2015

Mushrooms and Poly Tunnel

Mushrooms and Poly Tunnel

Earlier on in the year I tried growing mushrooms.

Previous posts:

I didn't think that the temperature was right and gave up on them but over the last couple of days they have appeared. I say they but more correctly "it" appeared.

One mushroom has grown:
It shows that it worked but hasn't exactly been a great success. I think I'll put the idea of growing mushrooms outdoors to the back of my mind for now :)


The poly tunnel on the other hand is going great. Everything is growing strongly even to the point where a harvest can now be taken from the salad leaves. The Spring Onions have germinated as well as the radish. The garlic, although not showing yet has grown some roots and is about to poke through the soil and the field beans sown in a corner to see if they will fruit earlier than outdoors have started to grow.

(Click to enlarge pictures)

On the left the Oak leaf lettuce and Mizuna are going very well as is the beetroot, on the right the Chard and Pak Choi are also growing very strongly.

In the middle the Spinach, Radish, Garlic, Spring Onion, Strawberry and Chinese Cabbage are doing just as well.

What is immediately noticeable is that none of the leaves have been nibbled so everything is looking perfect. The Cape Gooseberry has even flowered. It's only been a few weeks since we put the Poly Tunnel in (see: Poly Tunnel Post) but the extra warmth and humidity has made a big difference as has the fact that it hasn't needed watering much since the humidity and lack of a drying wind has kept the soil moist. The roof of the Tunnel collects water droplets and automatically waters the beds as well, which is a nice bonus.

Today has been a rather breezy day but the Tunnel's plastic isn't noticing the wind much which bodes well for the much windier days ahead. This week the max temp reached 30 deg C and the minimum went down to 1.2 deg C so no frosty conditions inside the tunnel even though a few people have commented that they have had a ground frost in the area. It is now noticeable that the day time sun is not effective enough to warm the soil to keep the night time temp higher than the outside by the end of the night and I think that after a few hours of darkness any residual heat has dissipated by midnight.

My next job, and probably tonight, will be to put a heater inside set to the anti-frost setting, on for 2 hours from midnight to see if that will keep the inside temp a degree or two above the outside temp. The tunnel is probably too big for the heater to raise the temperature enough so that it can turn off the heat. If it fails to heat up quickly and be able to turn off then it will be a waste of time as the cost of the electricity will be a waste of energy but it's worth a test. A 2 kW heater on for 2 hours is going to cost 26p a night but if it can manage to do it's job and only be on for 45 minutes then at under 10p a night it might just extend the growing season for a few more weeks before the proper cold weather sets in. Once the proper cold spell starts the idea of a heater becomes silly, price and energy wastage wise but if the plants can just be allowed to grow for another 2 weeks then the amount of salad leaves we get and can sell will make it worth while. The same will apply at the end of the winter. If we can get the temperature up by just a degree or 2 during the night late February and the day time sun starts to heat the tunnel then we might get a months head start on some crops for next year. If we can sell the leaves (as we currently do) a couple of weeks later and a few weeks earlier than the other Alford Country Market growers then we'll have one month per year being the only one selling these products and therefore no competition.

One of the problems with selling home grown produce is that when winter starts the customers will be forced back into the super markets to buy their greens for juicing. By postponing that by a few weeks you can keep them loyal for longer and they can keep their habit of buying from us. By starting to sell the greens earlier in the new year using a poly tunnel we will have more time to pull them back in and get them back in the habit of buying locally again before the main season starts.I can see the possibility that once the regular customers go back to the supermarket over winter they may not start to come back to the country market by the time we start selling again but if we have some of what they want before the start of the main season we can start to grab them back one by one slowly so they are already on the look out and thinking about the country market when our main produce starts coming through. Instead of being a slow start to the main season we may be able to get up to full speed selling quicker....anyway, if we don't try we'll never find the thing that works for us :)

Still hoping that the money and time spent on the poly tunnel will pay big dividends.    

Tuesday, 7 July 2015

Mushrooms, Seedlings and Harvest

Mushrooms, Seedlings and Harvest

Today 1st July 2015 the mushroom spawn has started to grow. Only a tiny bit though. The temp is 21 deg C inside the box and it has had a mist spray of water most days. It reached 26 deg C outside so the box is cooling things down in the sun. I still need to take a temp reading at night and compare inside and outside box temperatures.

The Swede seedlings in the new bed germinated and started showing on the 27th of June, 7 days after being sown. Yesterday, 30th June the Dwarf French beans started to show along with the carrot, which is 13 days to germinate and show and today, 1st of July, the normal French Beans started to show along with the Leek, and Spring Onions which are 14 days since sown. Unfortunately the slugs have started to thin the Swede already, which is fine if they stop now :)

A mole has decided to pop up in this bed. Not too bad, but a little disappointing. Also I have placed the potato plant leaves around the end of the bed to slow down the slugs.

Harvesting
Harvesting has been frantic but is so much better this year and for once we are getting organised and picking in batches, freezing or processing as soon as the produce is there.

The gooseberry bushes are full and I have picked about a 3rd of them to see if they ripen off of the bush, just in case the birds got hungry but also with the intention of turning these into jam.

We are up to about 14 kg of strawberries. A few kg frozen, many kg eaten or sold and around 3 kg turned into jam.

Both pictures of strawberries are about 1.5 kg each which is roughly the amount we are picking each day at present.

The first batch of jam is more of a preserve, we kept the strawberries in big lumps with the second batch they were much more mushed up. The first batch I think will be something that will be put on ice cream rather than bread as it is rather over the top and luxurious. This batch also didn't set quite as well as the second batch which will suit ice cream.

There were about 12 jars of strawberry jam as well as 7 red currant. Plenty more jam still to be made.


 Slowly melting the sugar.
The Red Currant jelly from the other day. We deliberately left the frothy stuff on the top...waste not want not :)


Big pieces of Strawberries - that's how I like it! Some of the jars aren't up to selling standard - note the old label :)


The second batch of Strawberry jam is more traditional.


About 1kg of Gooseberries. Some red and some green. When fully ripened these are very sweet. Not bad even now when not quite ripe though :)

Destined for jam.
Stella Cherries. About half the crop. Very nice. These were sold on Alford Country Market.


Red Currants.

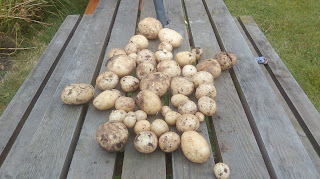
Pentland Javelin Potatoes - most of these were sold. Some eaten. They represent a tiny fraction of the whole crop.


The Globe Artichokes that we were selling end up as wonderful flowers. I'd never seen one before this one.


I was quite pleased with the garlic crop this year. Not as many as I now realise that I needed but they were a decent size. These fresh Garlic were on sale today at the Alford Country Market with a bigger one which sold for 50p. I have a couple of dozen of these plus a load of smaller ones and some still to harvest.

Thursday, 11 June 2015

Growing Mushrooms - Part 2

Growing Mushrooms - Part 2

Having read up a bit more I feel that my manure will have enough carbon and nitrogen and is only semi rotted / decomposed and therefore probably good enough for the mushrooms - if it isn't then I'll start from scratch with fresh manure, gypsum and straw as per instructions. If I do need to start from scratch then it will be only to see if I can get them to grow as it will be too much work to continue as a crop.

Hopefully, if I am right, then I now have a method of growing mushrooms in a repeatable manner with little fuss. 

The Mushroom spawn arrived, and I have mixed it with my compost. The compost is well wetted but not soaked.

In theory, as long as the temperature is around 20 to 26 deg C (30C and above will kill it lower than 20 will slow it) within a few days, perhaps 10 to 15 I should see the Spawn "running" through the compost like cobwebs. Growing outdoors means I'm at the mercy of nature for the temperature but as the spawn grows Carbon Dioxide is given off, which must be kept in the box, via a lid. The Carbon Dioxide encourages the growth. Depending on the temperature, humidity and carbon dioxide levels this stage could take weeks to months to finish.

Compost with the Spawn mixed in.
Each day, maybe several times a day, I'll need to make sure there is enough moisture in the compost but once the surface is full of cobweb like growth the next step can be made.


The next step is to encase the top of the mushroom compost with around 35mm of moss or normal garden compost (seed compost). CO2 (Carbon Dioxide) levels need to be reduced by removing the lid and letting in more air, and hopefully after a week or two there should be mushrooms.


One further problem seems to be that I may not have enough spawn for the size of the compost, but that won't matter too much as I will still be able to tell if the spawn is running and growing, if it is, but not enough to produce mushrooms I can simple add more spawn and wait again but this first attempt is mainly about seeing if my compost is right.

Fingers crossed.

Time taken to get to this stage:

30 mins for digging fire pit (re-usable)
30 mins creating box (re-usable)
10 mins digging earth for insulation (maybe more needed)
2 hrs moving manure and loading dustbin and emptying into mushroom box.
10 mins lighting fire and loading fire with wood.
10 mins mixing spawn.

Total: 3.5 hrs

Update
I can see by the thermometer that as long as there is sun, even intermittent, then the temperature is about 20C, full sun doesn't raise the temperature much more (about 22C) so far but cloudy overcast conditions drop the temp to 15C or so. There seems to be little air flow and with the moisture I think that the humdidity will be OK and without air flow the CO2 should stay in the box to a large extent since it is heavier than air so in theory should just sit on top and within the manure as the fungi grows.

At this stage I'm fairly optimistic, especially as I have since read that the manure just needs to be partly rotted to well rotted and the Ph is 7.5 and looks OK. The manure isn't drying out as quick as I thought so that means less work. Just a shame that the next 3 days look a bit cool and cloudy but after that the forecast is for hotter weather.

Wednesday, 10 June 2015

Growing Mushrooms - Agaricus bisporus - Part 1

Growing Mushrooms - Agaricus bisporus

The idea of growing mushrooms has long been in the back of my mind but it wasn't until a conversation with Nick Vowles of Marshland Permaculture Interest Group that trigged me in to action. Nick said that he had trouble growing Agariucs Bisporus and this sounded like a challenge.

Agariucs Bisporus are the common mushrooms that are normally in the shops, Button Mushrooms.

A quick Google led to Mushroombox who sell the spawn and a short while reading up at various places on the net seemed to suggest growing them in horse manure would be ideal. Manure is something I have lots of so although other mediums may be suggested I have opted to try manure. 

There are a few conditions of my own that must be met, namely they mush grow outside, in a wooden box and rather than mix in straw I need to use hay, since again, I have hay.

Mushrooms, like anything, need the correct habitat to grow and so it is all about creating that habitat and where ever possible reducing the competition that they will face - no rocket science involved.  My main problem is going to be getting and keeping temperature and humidity right because they will be outdoors. In nature the conditions often aren't correct and to a large extent I will be at the mercy of nature. To help with this I have placed earth around three sides of my box to help keep the temperature more consistent and maybe I will add earth to the fourth side although I have place the box next to a path - a slight error in the location although I can move the path since it's just a matter of changing the direction of the lawn mower :)

The Box
Plywood base (yes it will rot) but if successful I can put in concrete slabs. This is just a first attempt after all. Pallet sides which are nice as they fit together. I'll make a lid at a later stage. 


Next is the manure. The manure has lots and lots of bacteria and other fungi as well as all sorts of other creepy crawlies in it and all of these will be competition for the Mushrooms so to help them the manure needs to be pasteurized.

Pasteurizing 4 or 5 wheel barrow loads of manure isn't easy but an old metal dustbin and a fire to heat it up seem the best way. Hard work and time consuming but easily doable.

I dug a small fire pit, about 18 inches square and about 8 inches deep and placed bricks around it and laid broken paving slaps either side so that the dustbin could be supported while still exposing the fire to the base of the dustbin.

Pasteurizing
Approximately two thirds of the dustbin was filled with semi rotted (4 month old) manure and a couple of gallons of water added. The water will steam and heat the manure better as well as keep the metal bin from burning and melting a hole in.


I had read that the Agariucs Bisporus is a secondary composter which simply means that the manure needs to have already been partly composted by other organisms before it gets to work. Semi rotted manure seemed to fit the bill.

What I hadn't given much thought to was the time it would take to heat up all of the manure. Four wheel barrows took most of the day. I don't know how hot the manure got but I considered ready was when the manure at the top was very hot to tough and steaming away. The dustbin lid was there to simply help contain the heat.

The result
A bit more manure went in after this photo so the box was about half full. A lid was placed over the box and the next stage awaits.


I haven't totally worked out the next stage yet but it will involve adding hay (sterilized) and the spawn, which should arrive today or tomorrow and perhaps some Gypsum. I now need to look at getting the balance between Carbon and Nitrogen right. I may not need to do any more because the manure has straw and wood shavings in which means there may well be a good balance already. 

I think the manure does already have the correct balance, or at least a good enough balance, for mushrooms since many wild mushrooms and fungi in general can be seen growing in various places around the garden as well as the rotting manure pile but the hay may also be needed to help get oxygen into the manure as well as act as a casing for the later stage.

Part 2 in a few days.